Linux Disk Management: Partitioning, Formatting, and Mounting
Checking Installed Disks
- You can use the ls command to display information about hard disks installed in your computer.
- /dev/sda, /dev/sdb, etc. are hard disks, and /dev/sda1, etc. are partitions.
# ls -l /dev/sd*
brw-rw----. 1 root disk 8,  0 Oct 16 13:12 /dev/sda
brw-rw----. 1 root disk 8,  1 Oct 16 13:12 /dev/sda1
brw-rw----. 1 root disk 8,  2 Oct 16 13:12 /dev/sda2
brw-rw----. 1 root disk 8, 16 Oct 16 13:12 /dev/sdb
brw-rw----. 1 root disk 8, 32 Oct 16 13:12 /dev/sdc
You can check the file system in the following two ways.
- df -T: Check the file system of mounted partitions
- blkid /dev/sd*: Check the file system of all partitions
Creating Partitions
- The command to manage partitions is fdisk.
- If you want to manage the partitions of /dev/sdb, use the following commands.
# fdisk /dev/sdb
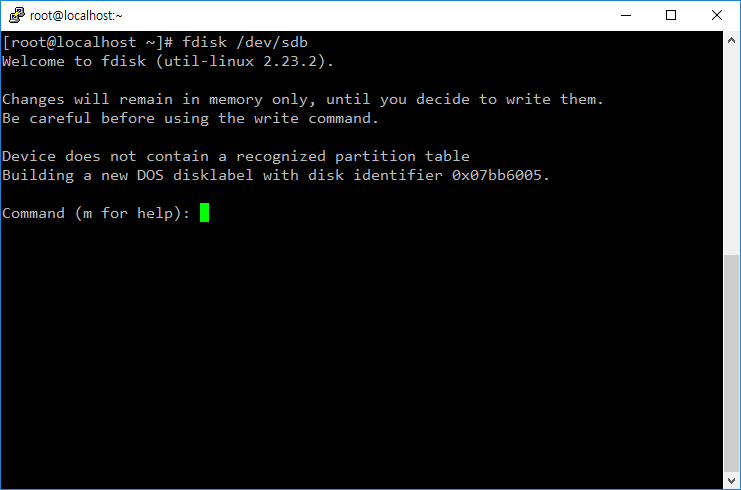
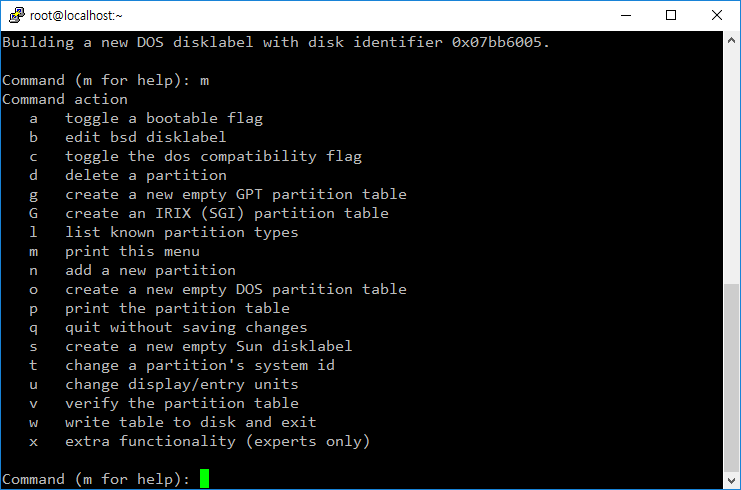
- If you need help, type m.
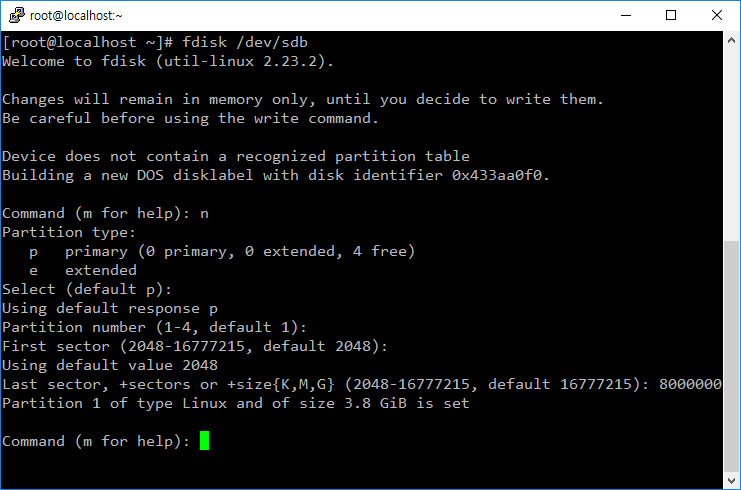
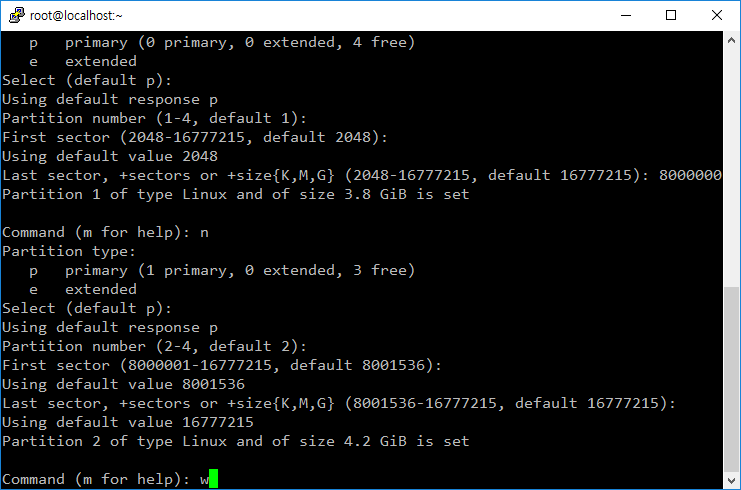
- To create a new partition, type n and follow the prompts.
- Type w to apply the changes.
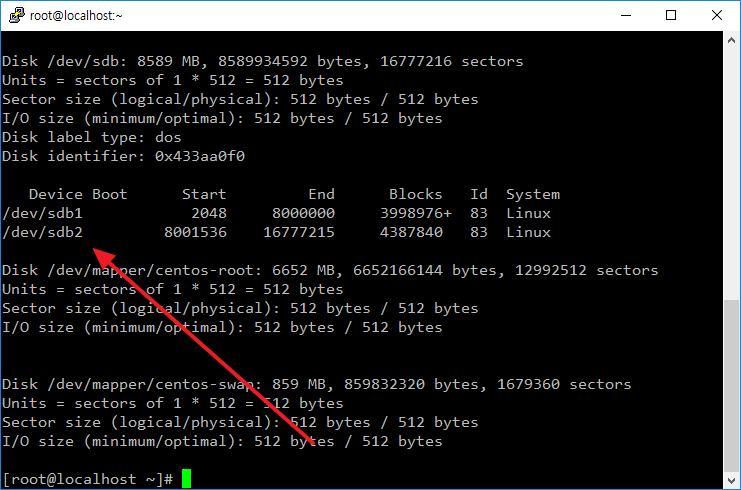
If you try to create a partition on a hard disk over 2TB, for example a 4TB hard disk, you will see a message like the following and will not be able to use the entire disk.
The size of this disk is 4 TiB (4398046511104 bytes). DOS partition table format cannot be used on drives for volumes larger than 2199023255040 bytes for 512-byte sectors. Use GUID partition table format (GPT).
In such a case, type g to create a GPT partition table and then make the partition.
Command (m for help): g
Created a new GPT disklabel (GUID: F13C6D0D-1E30-4448-B015-A61F3AE9EA48).
Formatting
- The command to format is mkfs. For example, to format the /dev/sdb1 partition with the ext4 file system, use the following command.
# mkfs.ext4 /dev/sdb1
- To format to the xfs file system, use the following command.
# mkfs.xfs -f /dev/sdb1
Mounting
- You need to attach the partition to a specific directory to be able to use that partition.
- For example, to mount /dev/sdb1 to the /mnt directory, use the following command.
# mount /dev/sdb1 /mnt
- To unmount, use the umount command. There are two methods.
# umount /dev/sdb1
# umount /mnt
- To have it automatically mount at boot, add the following code to the /etc/fstab file.
- This means to mount the /dev/sdb1 partition to the /mnt folder. Adjust options such as the file system as appropriate.
/dev/sdb1 /mnt xfs defaults 0 0
- If you want to immediately apply the changes made to the fstab file, use the following command.
# mount -a
Using UUID
A hard disk gets a name like /dev/sdb, and a partition gets a name like /dev/sdb1, but these names are not fixed. If you change the hard disk's mounting location or the recognition order changes, those names can also change. In such cases, mounting may not work properly. Therefore, when using fstab to mount, it is better to use the hard disk's unique value, the UUID.
- You can check the UUID with the blkid command.
# blkid
/dev/sda1: UUID="69d9add5-2153-4bc2-ad99-1560fb205c4b" TYPE="ext4" PARTUUID="aa61ba4b-01"
/dev/sda2: UUID="PuMuNg-5YHg-qikJ-tc10-iPIM-7W1q-4fUqyc" TYPE="LVM2_member" PARTUUID="aa61ba4b-02"
/dev/mapper/cl-root: UUID="79c8cfcb-c9e2-4243-8cf2-cf10eab57c40" TYPE="xfs"
/dev/mapper/cl-swap: UUID="b69a5fc3-98db-4a27-b3d4-a7ef76244ad1" TYPE="swap"
/dev/mapper/cl-home: UUID="fd372a6b-ee76-41d6-b7e6-6e6a7cf8193b" TYPE="xfs"
/dev/sdb1: UUID="fd95c93f-03fc-418a-a6db-c26b921ec93b" TYPE="xfs" PARTUUID="e5f55ef6-01"
- When adding mount information to /etc/fstab, include the UUID information as follows.
UUID=fd95c93f-03fc-418a-a6db-c26b921ec93b /home xfs defaults 0 0

Linux find Command: Search Files by Name, Type, Size, and Time
Learn how to search with Linux find by name, file type, size, and modification time, combine expressions, run commands safely, and verify targets before deletion.

Linux ip Command: Inspect and Configure Network Interfaces and Routes
Learn how to inspect and Configure Network Interfaces and Routes with the Linux ip command, including practical examples, key options, and important precautions.

Linux nslookup Command: Query DNS Names and Records
Learn how to query DNS Names and Records with the Linux nslookup command, including practical examples, key options, and important precautions.

Linux chmod Command: Change File and Directory Permissions
Learn how to change File and Directory Permissions with the Linux chmod command, including practical examples, key options, and important precautions.

Linux gunzip Command: Decompress gzip Files
Learn how to decompress gzip Files with the Linux gunzip command, including practical examples, key options, and important precautions.

Linux tr Command: Translate and Delete Characters
Learn how to translate and Delete Characters with the Linux tr command, including practical examples, key options, and important precautions.

Linux file Command: Identify File Types and Formats
Learn how to use the Linux file command to identify file formats from their contents instead of filename extensions, with essential options, practical examples, output interpretation, and common troubleshooting tips.

Linux ln Command: Create Hard Links and Symbolic Links
Learn how to create hard links and symbolic links with Linux ln, choose relative or absolute targets, replace links safely, and inspect link behavior.

Linux fg Command: Bring a Shell Job to the Foreground
Learn how to bring a Shell Job to the Foreground with the Linux fg command, including practical examples, key options, and important precautions.

Linux curl Command: Make URL Requests and Inspect HTTP Responses
Learn how to make URL Requests and Inspect HTTP Responses with the Linux curl command, including practical examples, key options, and important precautions.