Debian 13 Tutorial / Install a Minimal Server and Verify the First Boot
Install a minimal Debian 13 server from a verified netinst ISO onto a dedicated disk, with a regular sudo user, an SSH server and standard system utilities. Leave desktop tasks unchecked when the machine will serve only as a command-line server. Verify the first disk boot, administrator access and service state before treating the installation as complete.
Check the Installation Target and Recovery Point
Use the dedicated VirtualBox lab VM. The verified environment used VirtualBox 7.2.10, Debian 13.7.0 amd64 netinst, two CPUs, 4 GiB of memory, a new 40 GiB system VDI, EFI and NAT. Do not attach a physical disk or a data disk from an existing VM for this exercise.
Using the entire disk and creating filesystems can erase existing data on the selected disk. Compare the VM name, virtual disk path and capacity first. Only the intended system disk should be attached. If you see unexpected disks or existing partitions, stop and inspect the VM storage configuration before continuing.
If the disk is still new and empty, you can use a snapshot before installation as a recovery point. For disks that are already in use, a snapshot alone does not replace an independent backup. Even if errors occur during installation, it is better to preserve the error screen, chosen options, and disk state rather than repeatedly formatting, to help narrow down the cause.
Choose the Installation Language and Network Settings
When the VM starts, the Debian installation menu appears. Install is a text-based installation, and Graphical install proceeds with the same basic selection in a graphical interface. This guide uses the English option names. Choose a language you can read comfortably; the language selection does not determine whether you install a desktop.
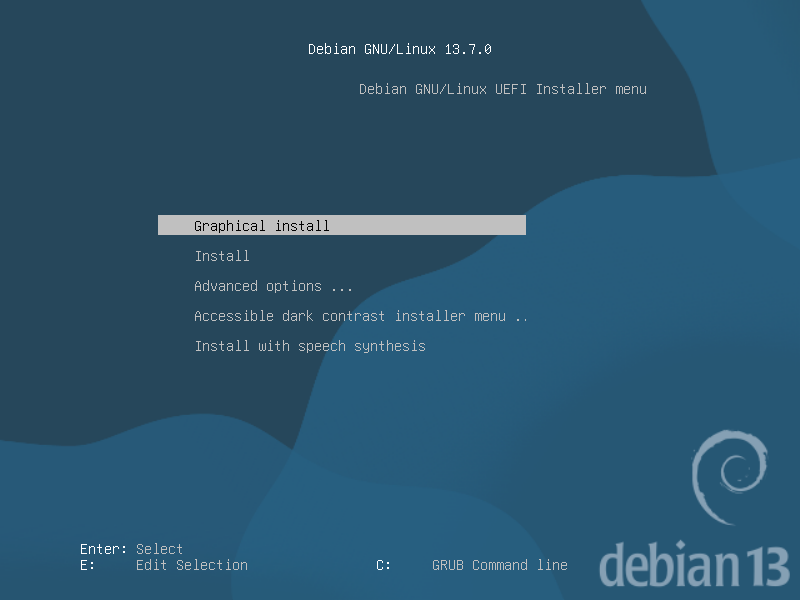
This is the Debian 13.7.0 EFI installation start menu confirmed on a dedicated VM. At this screen, Debian has not yet been installed on the disk.
- Select the installation language, location, and keyboard layout. If the purpose is to handle commands and logs in English, you can use the English locale. If you choose another language, also check font, input and console support after installation.
- Check the keyboard layout that will be used when entering the password. If the layout during installation and after login are different, pressing the same key may input a different character.
- Proceed with automatic network configuration of the NAT adapter. If automatic configuration fails, first check the virtual cable connection, DHCP, and external communication status of the host.
- Specify a dedicated hostname. For example, use a name that distinguishes it from other devices, like
debian13-lab. If you have no assigned domain or DNS requirement, do not enter someone else’s real Internet domain.
In the verification VM, en_US.UTF-8, the US keyboard, and Asia/Seoul time zone were used. The same selection values were applied to the preseeded installation, and the results were checked. The manual installation choices are described in the Debian installer guide. Do not reuse the lab account passwords or installation answer file in production.
Choose a Root Password Policy and Regular User
This course leaves the installer’s root password fields blank so that password login to root is disabled and the first regular user receives sudo access. The root account still exists. Log in as the regular user and prefix only commands that need administrative privileges with sudo. The account section of the Debian installer guide explains how this choice differs from setting a separate root password.sudo is used only for necessary commands. The behavior according to the installer’s root password selection can be checked in the account description of the same official installation guide.
| Selection | Points to check after installation |
|---|---|
| Leaving the root password empty | This is the method to disable direct root password login. Verify the first regular user and sudo privileges. |
| Setting a root password separately | This is different from the basic method described in this text. It does not assume that normal users are automatically given sudo privileges. |
| Regular User | You can decide on the actual name to use instead of lfstudent in the example. Then match the username and path in subsequent commands accordingly. |
Do not confuse name, login account, and password. The account name is used for login. Set a strong password and separately store the authentication method for the administrator account to avoid losing it. Do not put publicly known fixed passwords in examples or capture actual passwords in practice results.
Create Partitions and ext4 on the New Disk
Use guided partitioning on the new disk without LVM or encryption for this introductory lab. Logical Volume Manager (LVM), encryption and multiple disks change storage and recovery requirements; choose them only with an appropriate plan. Compare disk names and capacities with your VM, and never assume that /dev/sda is the correct installation target./dev/sda is the target for installation.
- Select the guided option to use the entire disk corresponding to Guided - use entire disk. Double-check that it is indeed the dedicated system disk confirmed earlier.
- In the file placement, select the configuration corresponding to All files in one partition. This places general files under the root file system; it does not necessarily mean that there is only one partition.
- Read the proposed layout in the final summary, including such as the root mount
/, ext4, EFI system partition, and swap. EFI boot requires an EFI system partition for the bootloader. - After confirming that only the intended new disk is displayed as the target for formatting, proceed with Finish partitioning and write changes to disk and the final write confirmation. If it differs from what was expected, return before approving the write.
In actual operation, a separate design is needed according to data separation, encryption, RAID, backup, and recovery requirements. The simple configuration selected here is a server introductory practice to distinguish disks and confirm normal booting. Do not unnecessarily delete and recreate partitions to make their names or sizes match the examples.
Select a Mirror, SSH Server and Standard Utilities
Netinst can obtain necessary packages from the network in addition to the basic installation materials. If there is no additional installation media, there is no need to continue scanning other disks. When selecting a mirror, choose an official Debian mirror accessible on your network, and do not bypass connection errors by turning off authentication or security verification.
On the software selection screen, select SSH server and standard system utilities. Deselect Debian desktop environment and individual desktop choices, as indicated below. In the text screen, Space toggles the selection of the current item, Tab moves to the buttons, and Enter proceeds.
- SSH server: Installs an SSH server for remote access. Just selecting it does not verify the external internet access path or authentication policy.
- standard system utilities: A collection of basic system tools.
- Debian desktop environment, GNOME and other desktops: Leave these unchecked for this minimal server. A machine used for graphical desktop work requires different choices.
Transfers and package installations may take time depending on network speed and mirror status. Do not determine whether to stop based only on the progress numbers. If there is an error, record the exact message and the failed mirror/package. Do not resolve issues by skipping repository signature verification or adding packages from unknown sources.
Boot from the Installed System Disk
After finishing the installation and bootloader setup, reboot the system. If the installation ISO remains connected and the installation menu appears again, do not reinstall immediately; first, check whether the system disk is selected as the boot device. If necessary, while the VM is off, simply disconnect the ISO from the virtual optical drive and boot from the disk. Do not confuse this with removing or deleting the VDI itself.
The first boot guide for Debian also explains checking the boot status after installation. When the text login screen appears, log in with the regular user account you created during installation. It is normal that the password you type does not appear on the screen.
The query commands below are executed on the console of the Debian guest. They are not commands to be run on Windows PowerShell.
cat /etc/os-release
uname -r
id
lsblk -o NAME,SIZE,FSTYPE,MOUNTPOINTS
findmnt /
findmnt /boot/efi
systemctl is-active ssh
Check VERSION_ID="13" and trixie, and in findmnt /, verify that the ext4 root of the actual system disk is connected. For EFI installations, also check the mounts in /boot/efi. The kernel version in uname -r may differ depending on the installation and update time, so do not judge failure solely because the numbers are different.
systemctl is-active ssh's active means the SSH service is running. Whether it can be accessed from another computer with the correct user and authentication method should be checked separately. At this stage, distinguish the different roles of NAT, the SSH server, and the user account.
sudo -v
sudo id -u
If sudo authentication works with a regular user's password and the last command outputs 0, it means that the administrative command was executed with root privileges. The login user itself has not been changed to root under normal circumstances. If there is no sudo privilege, first check the account used for installation and the root password selection, and do not copy unverified permission files.
The verification VM booted with Debian 13.7 and kernel 6.12.107+deb13-amd64. The EFI partition was vfat of /dev/sda1, root was ext4 of /dev/sda2, and swap was /dev/sda3. Do not apply these device names and sizes directly to other environments. The regular account lfstudent had UID and GID 1000, belonged to the sudo group, and root password login was locked.
We checked actual console login and sudo authentication, and SSH was active and enabled. Even after a normal shutdown and restart confirmed that the boot ID had changed, the root and EFI mounts and SSH status were maintained. This is the installation and boot verification of this dedicated VM and is not the validation result for arbitrary hardware or external networks.
In this environment, desktop tasks were not selected, but systemctl get-default displayed graphical.target. The desktop is not considered installed based on this name alone. During verification, it was separately confirmed that task-desktop, task-gnome-desktop, gdm3, and xserver-xorg-core were not installed.
Confirm Completion and Shut Down Safely
Installation is complete when Debian 13 boots from the system disk and you have verified regular-user login, root and EFI mounts, sudo access and the selected SSH service. Public network access, application deployment and backup restoration require their own checks.
Shut down normally from inside the guest. Forced power-off in VirtualBox can interrupt storage writes and should not be the routine shutdown method.
sudo systemctl poweroffAfter confirming that the power is actually off in VirtualBox, a post-installation baseline snapshot can be created. The pre-installation prepared-empty and the post-installation state are distinguished by different recovery point names, and necessary installation records and account authentication methods are securely stored. If the first boot fails, check console errors, disk connections, and firmware methods first before investigating the cause.